
FREE: 10 Must-Know Tomato Growing Tips Get The Guide
Read our affiliate disclosure here.
Garden Fall Cleaning Checklist, Part 1
Since 2010, Tomato Dirt has garnered 4.8+ million views, making it the web’s leading online source for growing tomatoes in the home garden. Award-winning writer and Tomato Dirt owner Kathy Widenhouse has helped thousands of home gardeners grow healthier tomatoes. Be one of them when you get Tomato Dirt’s Growing Guide here.
Updated 10.10.26
Clear Out Tomato Plants
Garden Fall Cleaning
Checklist – Part 1 of 3
(Download your copy of the checklist here.)
Your tomato plants have had quite a summer.
They've soaked up sunshine, guzzled gallons of water, stretched their branches in every direction, and (hopefully!) rewarded you with baskets of juicy tomatoes.
But now? They're looking a little tired.
The leaves are yellowing. The stems are scraggly. The last few tomatoes are hanging on for dear life. And you may be wondering whether to pull out your tomato plants or give them just a little more time.
Welcome to fall garden cleanup!
Clearing out tomato plants is one of the most important jobs on your fall garden cleaning checklist. And while saying goodbye to your summer garden can feel a little bittersweet, there's good news: A little cleanup now can mean fewer problems and healthier tomato plants next year.
Let's walk through when to remove your tomato plants, how to do it, what to save, what to toss, and how to give your garden soil a well-deserved rest.
Get your own FREE copy of the checklist here.
Fall Cleaning Checklist, Part 1:
Clear Out Tomato Plants
1. When should you pull out tomato plants?
First things first. Just because the calendar says fall doesn't mean your tomato plants are ready to call it quits.
In fact, some tomato plants keep producing well into autumn, especially if temperatures stay mild. So how do you know it's time?
Here are a few telltale signs:
- Your plants have stopped producing. Flowers are scarce, new fruit isn't developing, and growth has slowed to a crawl.
- The leaves are mostly yellow or brown. A few yellow leaves are normal, but widespread decline often signals the end of the season.
- Disease has taken over. If blight or another serious disease has spread throughout the plant, it's time to remove it.
- A hard frost is on the way. Tomato plants are frost-sensitive. Freezing temperatures can quickly turn those beautiful green vines into mush.
- You're ready to plant fall crops. Sometimes it's worth sacrificing a handful of late tomatoes to make room for lettuce, spinach, radishes, or other cool-season vegetables.
Tomato Dirt Tip: Don't rush! If your plants are still healthy and producing, let them keep going. You can always cover them during a brief cold snap to squeeze out a few more tomatoes.

2. Harvest every last tomato before you start
Before you start yanking out vines, go on one final tomato treasure hunt. You might be surprised at what you find hiding under the leaves.
Gather every usable tomato, including the green ones. You don't have to leave them behind simply because they haven't turned red.
Here's what you can do with your final harvest:
- Fully ripe tomatoes: Eat them fresh, freeze them, can them using a tested recipe, or turn them into sauce.
- Partially ripe tomatoes: Bring them indoors and let them finish ripening on the counter.
- Mature green tomatoes: Keep them indoors to ripen, or use them in recipes such as fried green tomatoes or pickles.
- Damaged or rotten tomatoes: Discard them rather than allowing them to sit in the garden.
Not all green tomatoes will ripen indoors. Mature green tomatoes have a better chance than small, immature ones.
And here's a handy trick: Place a few mature green tomatoes in a paper bag with a ripe banana or apple. The ethylene gas released by the fruit can help encourage ripening.
Don't put your tomatoes on a sunny windowsill. A comfortable room temperature is generally better for ripening.
3. How to remove tomato plants without making a mess
Successful gardeners know that one secret to a healthy tomato crop is to rotate crops.
Use a stake, post, rock or other marker to notate your tomato plants’ home in the garden this year. It’s best to give yourself this bit of extra insurance rather than trusting your memory, especially if you’ve grown tomatoes for more than one season. By marking your tomato growing spots, you will avoid planting them in the same row or area next year.
Step 3: Pick Up Fallen Fruit
Now comes the satisfying part: clearing out those tired vines.
But before you grab a stem and pull with all your might, consider what's happening underground. Tomato roots can spread several feet through the soil. Pulling out the entire root system may disturb soil structure, beneficial organisms, and nearby plants.
You've got two good options.
Option A: Cut tomato plants at the soil line
This is often the easiest method, particularly if you're growing in raised beds.
- Use clean, sharp pruning shears or loppers.
- Cut the main tomato stem at or just below soil level.
- Remove the aboveground plant material.
- Leave healthy roots underground to break down naturally.
As the roots decompose, they add organic matter and create tiny channels that help water and air move through the soil.
One important exception: If your tomato plants suffered from root-knot nematodes or a serious soilborne disease, don't deliberately leave infected roots behind. Remove as much affected root material as practical.
Option B: Pull out the entire tomato plant
Prefer a completely cleared bed?
- Loosen the soil around the base with a garden fork, then gently lift the plant.
- Try not to shake soil from diseased roots across the garden.
This method is especially useful when you're dealing with certain root problems or need to inspect the roots for disease.
Tomato Dirt Tip: Choose a day when the soil is slightly moist, not soggy. Roots will be easier to remove, and you'll be less likely to damage the soil structure.

4. Should you compost old tomato plants?
It may be
tempting to simply till all this year-end garden debris into your garden to
break it down or add it to your compost pile.
Here's where gardeners
sometimes disagree. Some gardeners toss their tomato plants onto the compost
pile without a second thought. Others wouldn't dream of doing it.
Who's right?
It depends on the health of your plants and how you manage your compost. Fungi, bacteria, insects, and larvae that affect tomatoes – including septoria leaf spot, early blight, late blight, fusarium wilt, verticillium wilt, and bacterial wilt – overwinter in the garden. By removing tomato plant debris (rather than composting it, working it into the soil, or leaving it until spring), you reduce buildup of diseases and pest infestation. So beware.
- Healthy tomato plants: You can compost them, especially if your pile is well managed and heats thoroughly.
- Diseased tomato plants: You’d think composting diseased tomato plants is an alternative, but to be truthful, it’s not a great idea. Most of the time, interior heat in compost piles does not reach a high enough temperature to kill pathogens. If you compost affected tomato plants or surrounding debris that have been exposed to fungi or bacteria, you risk infecting next season’s tomato plants. Remember that organisms can survive in weeds as well as tomato plants, so any growth surrounding tomato plants should be removed, too – including weeds.
That’s why it's usually safer to keep tomato plants out of a typical backyard compost pile. Many home piles don't reach consistently high temperatures throughout the material, so certain pathogens may survive.
And what about plants that have gone to seed?
If your compost pile doesn't heat up enough, tomato seeds may survive and sprout as volunteer plants next spring.
That's not necessarily a disaster. But if you've ever found 27 mystery tomato seedlings growing in your compost, you know how enthusiastically tomatoes can reproduce!
One more caution: Check local disposal guidelines before putting diseased plant material in municipal yard waste. Some programs accept it because they use commercial composting systems; others don't.
5. Don't forget the tomato cages, stakes, and trellises
Your tomato plants aren't the only things that need attention.
All those cages, stakes, clips, strings, and trellises have been working overtime, too. And they may be carrying soil, dried plant material, or disease-causing organisms from this season.
Here's a simple cleanup routine:
- Remove every bit of old vine, twine, and plant debris.
- Brush or wash off loose soil and dirt.
- Scrub supports with soapy water.
- If disease was a problem, disinfect nonporous supports using a product labeled for that purpose, following its directions.
- Allow everything to dry completely before storing.
Inspect wooden stakes for rot or splinters. Check metal cages for rusted or broken wires. If a support is falling apart, now's a good time to replace it rather than discovering the problem when next year's tomatoes are three feet tall.
Bonus tip: Bundle stakes by length and stack cages together. You'll thank yourself when planting season rolls around. (See more in Fall Garden Clean Up, Part 2).
6. Clean up fallen tomatoes, leaves, and garden debris
You've removed the plants. The supports are stacked. You're almost finished.
But take another look at the ground. See those fallen tomatoes hiding under the mulch? The dried leaves scattered across the bed? The little stems and branches you missed? They need attention, too.
So give the bed a thorough once-over.
- Lift old tomato debris, which can provide places for pests and disease organisms to survive between growing seasons.
- Gather fallen tomatoes, which can produce volunteer seedlings next spring.
- Remove old fruit, weeds, diseased leaves, and plant debris. If your mulch contains lots of infected material, remove it as well.
You don't need to strip the soil completely bare. Clean, healthy organic mulch can still protect the soil.
The goal isn't to sterilize your garden. It's to reduce problems that could carry over into next season.
7. Give your tomato bed a little TLC
Now that your tomato plants are gone, you've got a wonderful opportunity to improve your garden soil.
After all, your tomato plants have spent months drawing water and nutrients from it.
Here's how to prepare the bed for whatever comes next.
- Add compost. Spread an inch or two of finished compost over the soil surface. You don't necessarily need to dig it in. Earthworms and other soil organisms can gradually incorporate the organic matter.
- Consider a soil test. Fall is a convenient time to test soil pH and nutrient levels. That way, you'll know whether amendments are actually needed before next spring.
- Cover bare soil. A layer of shredded leaves, straw, or other clean organic mulch helps protect the soil from erosion and temperature extremes.
- Think about crop rotation. If possible, avoid planting tomatoes, peppers, potatoes, or eggplants in the same bed year after year. Rotating plant families can help reduce some pest and disease problems, although it won't eliminate every soilborne disease.
- Try a fall cover crop. Depending on your climate and planting schedule, oats, winter rye, or other cover crops can help protect the soil and add organic matter.
You don't need to do everything at once. Even adding a layer of compost and mulch is a great start. (Read more in Fall Garden Cleanup Part 3).
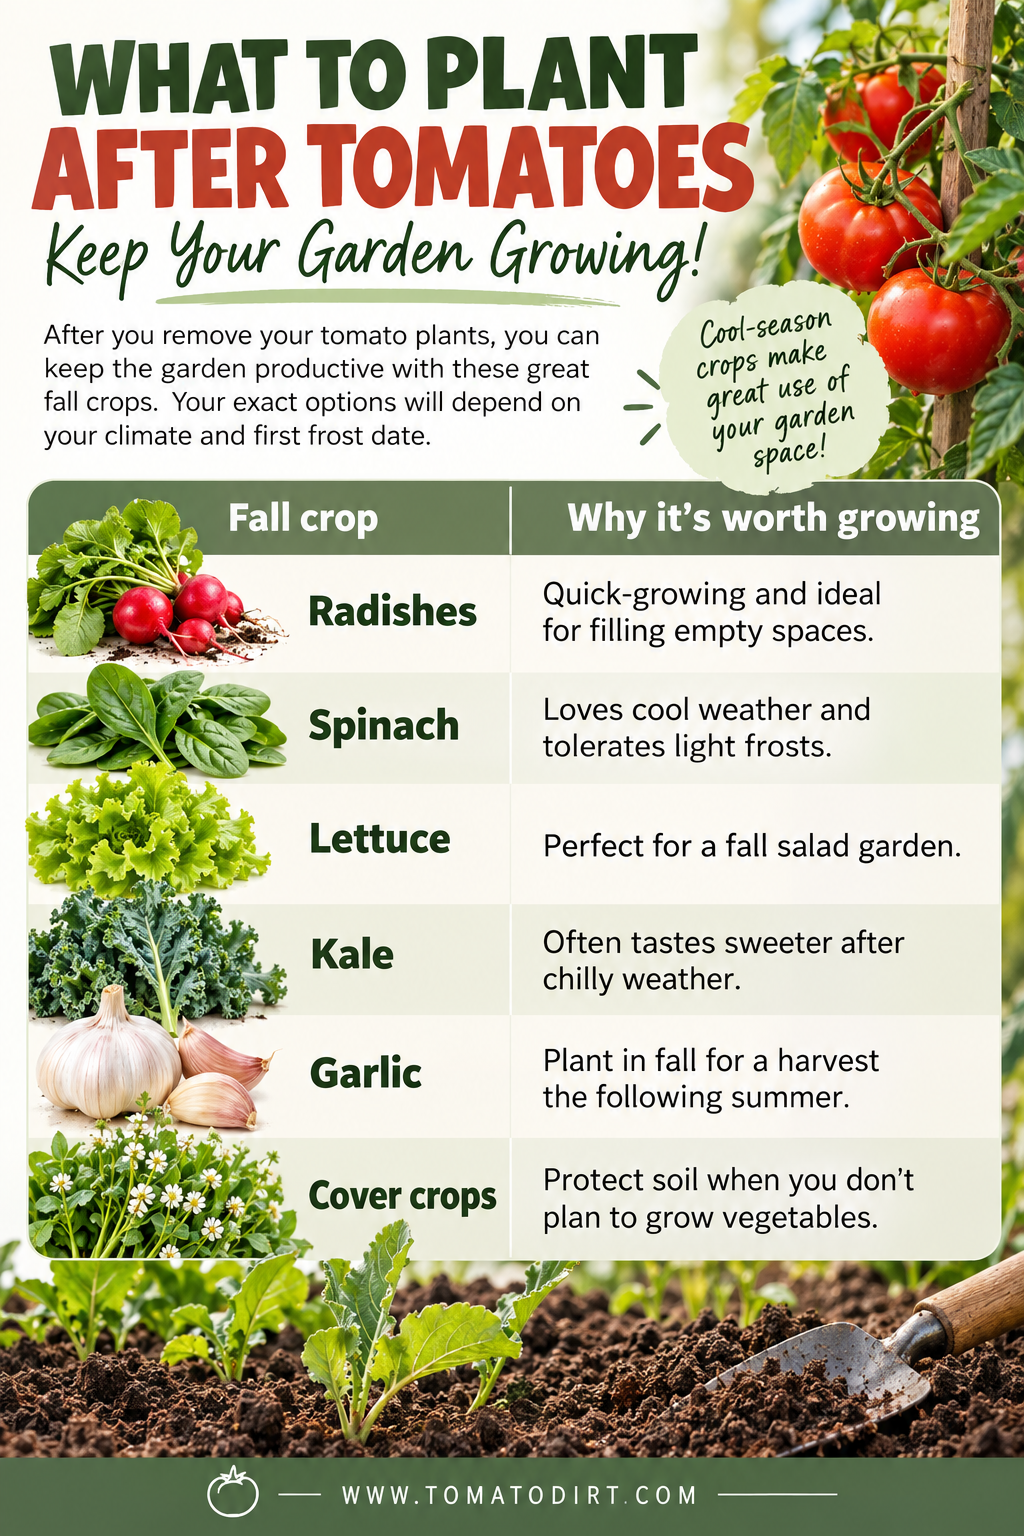


8. What can you plant after removing tomato plants?
Here's a little secret: Pulling out your tomato plants doesn't have to mean the end of your gardening season. In many regions, fall is a fantastic time to grow cool-season vegetables.
Check your local planting calendar before sowing. In cooler climates, there may not be enough growing time left for certain crops, while gardeners in warmer regions may enjoy months of additional harvests.
And if you're ready to put your feet up until spring?
That's fine, too. Your garden deserves a rest. So do you.
Tomato Season Review Printable:
Remember what worked. Forget what didn't. Grow better tomatoes next year.
One last thing before you say goodbye to your tomato plants
Before you haul away that final tomato vine, take two minutes to think about your growing season.
- Which tomato variety was your superstar?
- Which plant gave you nothing but trouble?
- Did your tomatoes suffer from early blight, blossom end rot, or a mysterious case of disappearing fruit?
- What would you do differently next year?
Jot down a few notes now, while the season is fresh in your mind. Next spring, those observations will be far more useful than trying to remember whether it was your Celebrity or Better Boy that produced all those delicious tomatoes.
You can also record these details in your garden journal or Tomato Season Review Printable.
A little reflection is one of the easiest ways to become a better tomato gardener.
A clean garden today, healthier tomatoes tomorrow
Clearing out tomato plants may not be the most glamorous gardening job. There are no juicy red tomatoes to show off, no exciting seedlings to admire, and no big harvest baskets to fill.
But it's one of those small, behind-the-scenes tasks that can make a real difference.
You're reducing places where pests and pathogens can linger. You're protecting your soil. You're taking care of your gardening equipment. And you're getting everything ready for another wonderful tomato-growing season.
So grab your pruning shears, put on your garden gloves, and give those tired tomato plants a proper send-off.
They've earned it.
And when spring comes around, you'll be glad you did.
More about Fall Garden Clean Up
How to Get Started with Tomato Garden Fall Clean Up ...
Your End-of-Season Garden Checklist: Finish Strong, Start Fresh Next Spring ...
How To Protect Outdoor Pots in Winter ...
The Best Time of Year To Clear a Garden ...
Free Download: Fall Cleaning Checklist for Your Vegetable Garden ...
Tomato Garden Fall Cleaning Checklist, Part 2: Remove Tomato Supports
Tomato Garden Fall Cleaning Checklist, Part 3: Burn, Turn, Mulch
When to Remove Tomato Plants in the Fall ...
How To Conduct a Tomato Garden Year In Review ...
How to Take End of Season Notes about Your Tomato Garden ...
How to Winterize Your Garden: It's More Than Just Fall Clean Up ...
How To Improve Your Garden Soil Over Winter ...
Get more tips on our Fall Garden Clean Up Pinterest board...
Return from Tomato Garden Fall Cleaning Checklist, Part 1
to Tomato Dirt home
Before you leave ...

Get your free copy of "10 Must-Know Tomato Growing Tips." This 20-page guide is filled with tips you need to know to have a successful tomato crop, whether you’re a beginning or experienced gardener.
As an Amazon Associate and Rakuten Advertising affiliate I earn from qualifying purchases.
SHARE THIS PAGE:
